

Recent Posts
- RED BARN REVIEW — A Country Silhouette in Autumn Colors
- The Electroplated Heartbeat: Why This Toy Chopper Roared Louder Than Expected
- Subject: Important Notice: Correction to the CHAN Bonsai Model Manual
- How Milk, Iron Dirt, and Plastic Bricks Became America’s Soul: Inside the Red Barn Revival
- Nifeliz Chinese Garden Review —— A Brick-by-Brick Tribute to Jiangnan’s Poetic Waterscape
Preface
“This hands-on review is NifeliZ’s collaborative experiment in authenticity: a diverse team—from office professionals and LEGO enthusiasts to musicians and photographers—built our own kits alongside fans to experience their joys, struggles, and “aha” moments firsthand. By sharing raw insights into what works, what doesn’t, and how we’ll improve, we aim to create products that truly resonate with builders while offering you practical guidance.
Whether avoiding pitfalls or enhancing your creative flow, this collective journey—fueled by varied perspectives but united in purpose—is designed to make every assembly smoother, every connection more meaningful, and every build a shared story of growth.”
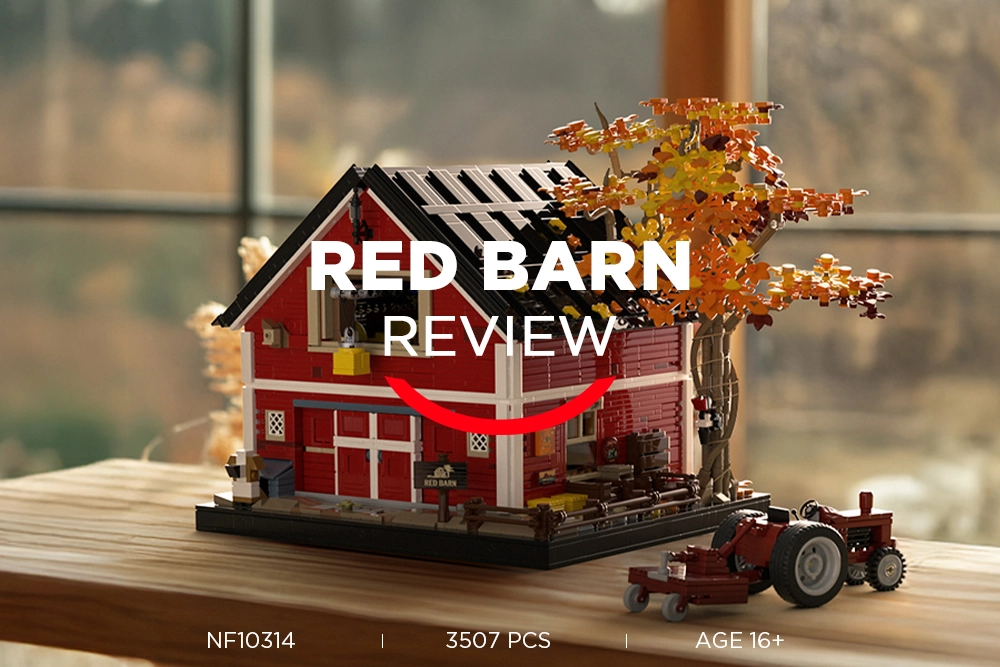
Hello everyone, I’m Cecilia. Today I want to take you through a unique building block set — a red barn full of American countryside charm.
Have you ever had this image in your mind: sunlight streaming through weathered wooden windows onto haystacks, horses leisurely strolling in the distance, and the sound of the breeze blending with the soft clicks of old machinery? It’s a kind of tranquility and warmth that only nature can offer.
This American-style barn model feels like a painting of that countryside scene, broken down into tiny pieces, waiting for you to put it back together with your own hands.
Let’s dive into this building journey and uncover the surprises and details hidden within!
I.Packaging and Contents
The matte black box comes in a two-piece lid and base design. The front features a vivid autumn rural scene with a red barn, trees in fall colors, and a vintage tractor. The atmosphere is rich, warm, and full of storybook charm. Product information is clearly labeled, and the overall packaging quality is excellent — perfect for collection or as a gift.
")
Box contents:
●Bag #1 — 4 bags (Steps 1–47)
●Bag #2 — 9 bags (Steps 48–182)
●Bag #3 — 4 bags (Steps 183–274)
●Bag #4 — 7 bags (Steps 275–372)
●Bag #5 — 4 bags (Steps 373–476)
●Bag #6 — 6 bags (Steps 477–574)
●Bag #7 — 5 bags (Steps 575–644)
●Bag #8 — 6 bags (Steps 645–798)
●Bag #9 — 1 accessory bag
●1 instruction manual
●5 storage boxes
●1 bookmark
")
")
Everything’s ready — let’s officially start building!
II. Assembly Process
1. Phase One: Bag #1 (Base Frame)
We start with Bag #1, which includes 4 smaller bags.
")
Begin with Bag [1.14], building the basic frame.
")
")
")
Open Bag [15.23] to reinforce the baseplate.
")
The base is complete — like laying a smooth foundation for the barn.
")
Continue with Bag [24.31] for more base work.
")
")
Then open Bag [32.47].
")
The stable begins to take shape. A pleasant surprise: the stable doors are printed parts with clear wood grain and metal latch details — top-tier quality!
")
2. Phase Two: Bag #2 (Life & Interior Structure)
Bag #2 contains 9 bags.
")
Start with Bags [48.72-1] and [40.72-2] to build two horses.
")
By step 72, the two horses are fully built and full of personality.
")
Continue with Bags [73.95-1] and [73.95-2] to begin the interior structure.
")
In steps 74 and 75, the small fan design is quite clever.
")
The transparent cover has no fixed studs and is meant for placement only — very clean visually.
")
Proceed with Bags [96.124-1] and [96.124-2].
")
Please note that one part is actually hidden inside bag number 9, which is not indicated in the instruction manual. We suggest adding this clarification in future revisions.
")
")
Step 124 completed.
")
Use Bags [125.148] for wall construction.
")
Pay special attention to color distinctions. The manual is reflective under light, and it’s easy to confuse parts.
")
")
Open Bag [149.169] to continue wall structure.
After step 152, minor gaps may appear; at step 153, the 1×4 part is difficult to insert and may slightly deform.
")
")
This phase completes the storage room walls, and the barn facade is forming.
")
")
Open the final bag of Bag #2 [170.182].
")
Note: in step 182, part orientation is missing — use previous and next diagrams to infer placement.
")
")
")
3. Phase Three: Bag #3 (Walls & Doors, Full Structure)
Bag #3 includes 4 bags.
")
Start with Bag [183.199] to build the stable walls.
")
The stable walls are completed, giving the structure a sense of enclosure.
")
Continue with Bag [200.227].
")
Steps 210 and 213 require extra pressure to ensure tight assembly.
")
")
Step 226 introduces sliding barn doors; step 227 reveals an increasingly clear layout.
")
")
Open Bag [228.257] for the other side door structure.
")
Step 256 also includes sliding doors that install easily and slide smoothly.
")
Open the last small bag [258.274] in bag number 3.
")
Step 260 is easier with help from the right-side sub-image.
")
Step 273 completes the front porch steps.
")
At step 274, make sure windows remain open before combining assemblies.
")
4. Phase Four: Bag #4 (Side Yard & Second Floor)
Bag #4 includes 7 bags.
")
Begin with Bags [275.299-1] and [275.299-2].
")
At step 276, refer to the right sub-image for easier assembly.
")
Step 288 requires careful color identification.
")
By step 299, the side yard is done — the atmosphere intensifies.
")
")
Proceed with Bags [300.320-1] and [300.320-2].
")
After step 313, the first floor is finished.
")
The large image in step 320 isn’t too helpful — use the top-right sub-image for accuracy.
")
")
The tractor is a decor piece, not fixed in place — no clutch required.
")
Next, open parts bag [321.344] and begin assembling the second layer structure.
")
Step 336 complete.
")
")
Step 344 completes the second-floor frame.
")
")
Open bag [345.355] to start laying the ground.
")
")
")
Continue with Bag [356.372].
")
This section includes color tones that are hard to distinguish — recommend adding clearer labels in the manual.
")
")
5. Phase Five: Bag #5 (Second-Floor Wall Construction)
Bag #5 includes 4 bags.
")
Begin with Bag [373.389].
")
Step 374 finishes pillars, next comes wall building.
")
Step 389 complete.
")
Next, open bag [390.426] and continue assembling the walls.
")
")
Then open Bag [427.442].
")
Steps 438–441 are repetitive. For each step, assemble four units simultaneously to improve efficiency.
")
")
Finally, open Bag [443.476].
")
By step 474, the second floor is essentially complete.
")
Merge the second floor with the first floor.
")
6. Phase Six: Bag #6 (Roof Structure & Rope System)
Bag #6 includes 6 bags.
")
Start with Bag [477.500-1] — there’s actually only one bag, though labeling may confuse.
")
In step 485, the “ * ” parts are chromed — be sure to identify them.
")
The rope in step 491 is from Bag #9.
")
In step 493, thread the rope through two holes and tie a knot.
")
Step 496 completes the suspension device.
")
After installing the suspension mechanism on the second floor, turning the gear retracts the haystack, adding a fun interactive element. However, to push the haystack back out, the rope must be pulled manually, which slightly reduces the level of automation.
")
Because the hay is lightweight, the rope sometimes stutters during descent.
")
Adding two small weight bricks improves smoothness significantly.
")
Continue with Bag [501.514] for roof construction.
")
In step 507, the yellow piece is well hidden — don’t miss it.
")
Step 514 complete.
")
Open Bag [515.530].
")
")
Step 530 complete.
")
")
Open Bag [531.543] to continue roof building.
")
Step 536 completes the main roof panel with fallen leaves and flowers — excellent detail.
")
In step 543, connect the right roof wing with Technic pins and leave a hinge for flip-open functionality.
")
Next, open Bag [544.556] for more roof.
")
Step 565 complete.
")
")
Continue with Bag [566.574].
")
In step 571, one part broke. Fortunately, this section will eventually be covered by other components, so it does not affect the overall appearance or structural stability.
")
By step 574, the interlaced shingles look just like a real barn roof — great texture.
")
7. Phase Seven: Bag #7 (Roof Panels)
Now moving on to Bag 7, which includes a total of 5 parts bags, mainly used for assembling the roof panels on the opposite side.
")
Start with Bag [575.588].
")
")
Open Bag [589.599].
")
Step 595 features modular assembly for clarity.
")
")
Step 599 complete.
")
Open Bag [600.611].
")
")
Then open Bag [612.627].
")
")
Finally open Bag [628.644].
")
Step 636 done.
")
")
Step 641 finishes the shingles.
")
In step 642, the two roof panels are clipped and pinned together to form a classic A-frame — roof assembly done.
")
Now at step 644, assembling the roof becomes more challenging. You’ll need to open the window to help adjust the angle of the cross axle, but the limited space makes the operation somewhat difficult.
")
")
The barn is now officially topped off!
")
8. Phase Eight: Bag #8 (Maple Tree & Mower Decor)
Bag #8 includes 6 bags for scenery builds.
")
Start with Bag [645.662].
")
Maple tree base complete.
")
Continue with Bag [663.696].
")
Step 667 finishes the trunk.
")
The rope in step 679 is also from Bag #9.
")
Step 696: trunk and branches finished.
")
Open Bag [697.730] for foliage.
")
In step 711, the manual lacks direction arrows, making orientation unclear.
")
Step 730 complete.
")
Open Bag [731.769] for more foliage.
")
In step 730, the hinge rods are loose; heavy leaves cause drooping.
")
The finished maple tree is vibrant and lifelike.
")
In step 769, install the tree into the reserved base — sturdy and complete.
")
Open Bags [770.798-1] and [770.798-2] to build the lawn mower.
")
")
")
The mower is a nice decorative touch — adds daily-life realism to the barn!
")
III.Overall Evaluation
")
This American barn model has high completion and excellent mechanical playability — especially the second-floor hoist system. The hay bale can be lifted and stored with satisfying operation. However, pulling it out still requires manual effort, and because the hay is lightweight, the rope may jam on descent.
The scene design is delightful. The first-floor tool and stable area is packed with detail — retro posters on the wall, scattered hay and tools on the floor — full of rural life. The maple tree, fences, and tractor add seasonal richness and storytelling.
There are bumps in the building process. Some part numbers are missing from the manual, repeated steps lack frame highlights, similar-colored parts are hard to distinguish, and some diagrams lack clear direction — which may trip up beginners.
Overall, the model excels in both aesthetics and interactivity. It’s ideal for builders who enjoy realism and mechanics. While minor flaws exist, the final result delivers rewarding atmosphere and fun that outweighs the hassle.


- No Comments